Best Time & Temperature to Bake Breaded Chicken
Best Time & Temperature to Bake Breaded Chicken
There’s nothing worse than biting into what should be crispy, golden-brown chicken only to find a soggy crust or undercooked meat. Whether you’re prepping for a weeknight dinner or hosting guests, perfecting this dish comes down to two things: time and temperature.
Professional chefs and home cooks agree—400°F (200°C) is the sweet spot for achieving that ideal crunch. This heat level crisps the coating without drying out the meat. But thickness, breading type, and even oven quirks play a role. Let’s break down the science behind flawless results.
Table of Contents
Key Takeaways
- 400°F (200°C) ensures a crispy exterior while keeping chicken juicy.
- Flip halfway through for even browning.
- Internal temperature must reach 165°F (74°C) for safety.
- Use a wire rack to promote airflow and crispiness.
- Adjust cooking time based on thickness—thicker cuts need longer.
Why Baking Breaded Chicken Is a Weeknight Favorite
Busy weeknights call for meals that are quick, delicious, and hassle-free—enter crispy oven-baked chicken. With minimal prep and no messy oil, it’s a crowd-pleaser that fits any schedule.

Boneless, Skinless Chicken Breasts: A Blank Canvas
These cuts are a staple in 97% of U.S. supermarkets, per USDA data. Their neutral flavor pairs with any seasoning, from smoky paprika to zesty lemon pepper. Plus, they cook evenly, reducing the risk of dry spots.
Crispy Texture, Healthier Approach
At 400°F, the oven triggers the Maillard reaction—the same browning magic that gives fried food its crunch. But here’s the win: baked versions average 19.5g fat versus 40g+ in fried. A wire rack elevates the chicken for airflow, ensuring all sides crisp evenly.
“Family loved it! Even my picky eater asked for seconds.”
Whether you’re gluten-free (swap in GF panko) or craving Italian flavors (try herb-infused breadcrumbs), this recipe adapts. Just remember: USDA guidelines recommend an internal temp of 165°F for safety. A meat thermometer is your best friend.
Essential Ingredients for Perfect Breaded Chicken
Your coating’s crunch and flavor depend on three key elements. The right combination ensures a crispy exterior while locking in moisture. Let’s explore each component for foolproof results.

Choosing Your Chicken Cut
Boneless breasts work for even cooking, but tenders cook faster. For cutlets, pound meat to ½-inch thickness—this prevents uneven browning. Thinner pieces crisp up quicker without drying out.
Breading Battle: Panko vs Traditional
Panko breadcrumbs create an airier crunch with 30% less sodium than regular varieties. Mix them with Italian-seasoned crumbs for layered texture. Gluten-free? Crushed cornflakes or almonds add similar crispness.
Pro tip: 1 cup of crumbs coats two large breasts perfectly. Press the mixture firmly to help it adhere during cooking.
Binding Agents That Boost Flavor
Egg wash is classic, but a mustard-mayo blend adds tangy richness. Dip chicken in flour first—it soaks up excess moisture so the egg mixture sticks better. For extra crispiness, refrigerate breaded pieces 30 minutes before baking.
“The panko-Parmesan combo gave our chicken a restaurant-quality crunch.”
Remember: Thicker coatings need higher heat to crisp properly. Pair your ingredients with the 400°F oven method for golden perfection every time.
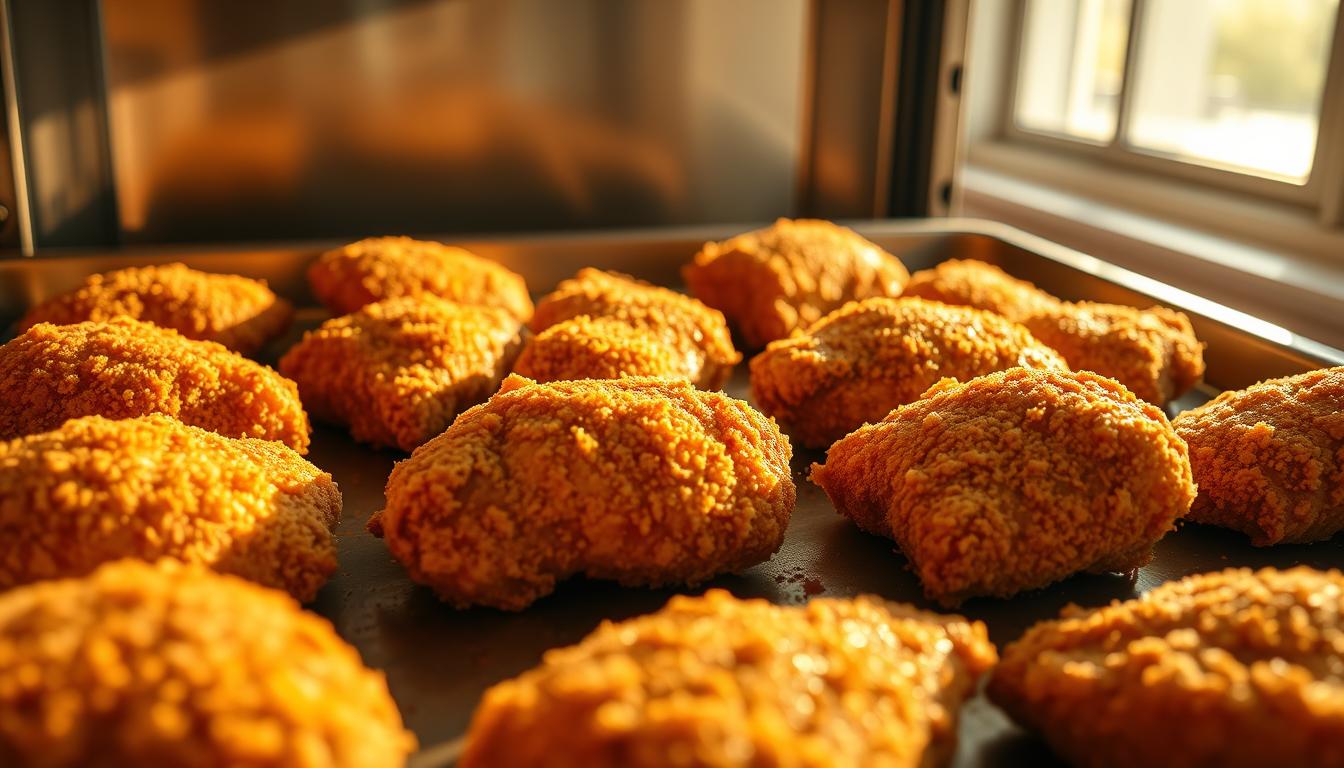
How Long to Bake Breaded Chicken for Crispy Results
Golden-brown perfection starts with mastering the clock. At 400°F, most cuts need 20–30 minutes to reach the USDA-safe 165°F internally. Use a meat thermometer to confirm—don’t guess.
Thinner cutlets (½-inch) may finish in 20 minutes, while thicker breasts (1-inch+) could take 30. Flip halfway for even browning. *Broil 2–3 minutes at the end* for extra crunch.
Total hands-on time? About 40 minutes (15 prep + 25 cook). Remember: residual heat continues to cook the chicken after removal. Pull it at 160°F; carryover does the rest.
“Halved the recipe for jumbo breasts—added 5 extra minutes. Came out juicy and crisp!”
Overcrowding the pan traps steam, softening the crust. Use a wire rack for airflow. Stick to these guidelines, and soggy coatings become history.
Preheating and Prep: Keys to Even Cooking
Perfectly crispy breaded chicken starts long before it hits the oven. Skipping these steps risks uneven browning or a soggy crust. Master the basics, and your results will rival fried versions—without the grease.
The Science Behind 400°F
Your preheat oven to 400°F isn’t arbitrary. This temperature balances browning and moisture retention. High heat triggers the Maillard reaction (crust formation) before the interior dries out. Pro tip: Ovens vary—use an oven thermometer for accuracy.
Pounding for Consistency
Uneven chicken breast thickness leads to hotspots. Aim for ½-inch to 1-inch uniformity. No mallet? A rolling pin or heavy skillet works. Halve thicker cuts horizontally for faster cooking.
- Baking sheet setup: Foil traps steam; parchment promotes crispiness. For maximum airflow, elevate chicken on a wire rack.
- Oil application: Lightly drizzle olive oil or use a spray bottle for even coverage.
“Halving jumbo breasts saved dinner—no more raw centers!”
Rest breaded pieces in the fridge 15 minutes before baking. This helps the coating adhere and enhances crispiness. With these steps, every bite delivers crunch and juiciness.
Step-by-Step Breaded Chicken Baking Guide
Achieving restaurant-quality crunch at home is easier than you think with this foolproof method. Follow these steps for golden, crispy results every time.
Coating the Chicken Evenly
Set up a three-stage breading station: flour, egg wash (or mayo-mustard blend), and crumbs. Press panko or seasoned breadcrumbs firmly onto the chicken to ensure adhesion. For extra crispiness, refrigerate coated pieces for 30 minutes before cooking.
“The mayo-mustard mix added a tangy kick—kids devoured it!”
Using a Baking Sheet vs Wire Rack
A wire rack elevates the chicken, allowing air to circulate for even browning. No rack? Use a dark sheet (preheated) for better heat conduction. Foil-lined pans trap steam, while parchment paper promotes crispiness.
- Cleanup tip: Non-stick sheets reduce sticking; foil simplifies scrubbing.
- Portions: 2 lbs of chicken serves 4 (about ½ lb per person).
Broiling for Extra Crispiness
For a final crunch, broil 2–3 minutes. Watch closely—high heat can burn coatings quickly. Rotate the pan to ensure even browning.
Garnish with lemon wedges and fresh parsley for a vibrant finish. Pair with coleslaw or arugula for a balanced meal.
Creative Variations to Try
Transform your weeknight dinners with creative twists on classic breaded chicken. These recipes prove that a simple coating can become anything from Italian-herbed to fiery Mexican-style. The secret? Smart ingredient swaps and global inspiration.
Herb-Infused Breadcrumbs
Elevate your flavor profile with fresh or dried herbs. Mix 2 tbsp each of basil, oregano, and thyme into 1 cup panko for Mediterranean vibes. Parmesan adds umami depth—try ¼ cup grated cheese per batch.
“The za’atar-panko combo made our chicken taste like a Jerusalem street food stall!”
Spicy or Cheesy Twists
Turn up the heat with 1 tsp cayenne pepper per cup of crumbs. For cheese lovers, blend ½ cup shredded cheddar with breadcrumbs. These recipes work equally well with tenders or cutlets.
- Global flavors: Tajín (Mexican chili-lime), garam masala (Indian), or furikake (Japanese)
- Dietary swaps: Crushed pork rinds (keto) or nutritional yeast (vegan)
- Cheese formats: Powdered Parmesan adheres better; shredded melts richer
Pair your creations with sides that complement the theme—think garlicky fries with Italian versions or mango slaw for spicy batches. Even meat-free options shine with chickpea-crusted cauliflower.
Conclusion
Mastering crispy oven-cooked poultry is simple with the right formula: 400°F for 25 minutes plus proper prep. This method guarantees juicy meat with a golden crust every time.
Don’t hesitate to experiment. Try herb-infused crumbs or spicy twists for exciting flavors. Compared to frying, this recipe cuts fat while keeping crunch intact.
Pro tip: Let your chicken rest 5 minutes before slicing. This locks in juices and maintains texture. Perfect for quick dinner solutions or meal prep.
Did this guide help? Share your results and rate the method if you try it!